You may have seen our recent announcement of changes to the verification system in Webmaster Tools. One side effect of this change is that blogs hosted on Blogger (that haven't yet been verified) will have to use the meta tag verification method rather than the "one-click" integration from the Blogger dashboard. The "Webmaster Tools" auto-verification link from the Blogger dashboard is no longer working and will soon be removed. We're working to reinstate an automated verification approach for Blogger hosted blogs in the future, but for the time being we wanted you to be aware of the steps required to verify your Blogger blog in Webmaster Tools.
Step-By-Step Instructions:
In Webmaster Tools
1. Click the "Add a site" button on the Webmaster Tools Home page
2. Enter your blog's URL (for example, banglaititps.blogspot.com) and click the "Continue" button to go to the Manage verification page
3. Select the "Meta tag" verification method and copy the meta tag provided
In Blogger
4. Go to your blog and sign in
5. From the Blogger dashboard click the "Layout" link for the blog you're verifying
6. Click the "Edit HTML" link under the "Layout" tab which will allow you to edit the HTML for your blog's template
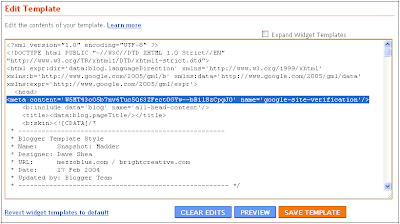
7. Paste the meta tag (copied in step 3) immediately after the element within the template HTML and click the "SAVE TEMPLATE" button
In Webmaster Tools 8. On the Manage Verification page, confirm that "Meta tag" is selected as the verification method and click the "Verify" button Your blog should now be verified. You're ready to start using Webmaster Tools!
Step-By-Step Instructions:
In Webmaster Tools
1. Click the "Add a site" button on the Webmaster Tools Home page
2. Enter your blog's URL (for example, banglaititps.blogspot.com) and click the "Continue" button to go to the Manage verification page
3. Select the "Meta tag" verification method and copy the meta tag provided
In Blogger
4. Go to your blog and sign in
5. From the Blogger dashboard click the "Layout" link for the blog you're verifying
6. Click the "Edit HTML" link under the "Layout" tab which will allow you to edit the HTML for your blog's template
7. Paste the meta tag (copied in step 3) immediately after the element within the template HTML and click the "SAVE TEMPLATE" button
In Webmaster Tools 8. On the Manage Verification page, confirm that "Meta tag" is selected as the verification method and click the "Verify" button Your blog should now be verified. You're ready to start using Webmaster Tools!
No comments :
Post a Comment